
So you’ve decided to rebrand your company. To keep your SEO value, retain your audience, and not confuse your customers and staff there are a few things that need to happen. This post covers important items to implement prior to the rebrand, during, and after.
Project 1: Defining Your New Brand
Contributed by Brian Sly, Content Engagement Strategist, Emblem Media
Branding is more than just logos and colors. When thinking about long term success for your brand, what is your core essence? By understanding your core essence, you can create a psychological foundation for your business that surrounds everything else. This will help you create a true north, so everything that is designed and created outside of your foundation can still point back to it.
For example, if your brand essence is calm, you won’t want a logo that has jagged lines or aggressive colors like red and purple. You wouldn’t want a competitive atmosphere at your office. You would want more collaborative and inclusiveness. You wouldn’t want consistently hard deadlines or a communication style that comes off as assertive.
The more detailed you can get with your “brand essence,” the easier it will be for everyone to be on the same page.
Your customers will feel it, your employees will feel it, and your products/services will convey it. If there is a disconnect in one or more areas, such as your marketing, you can always come back to your core essence to point you in the right direction.
Here are some questions that will help you think about the brand in the future so that you can find an essence that won’t need another rebrand in 1-2 years:
- What is your primary mission or purpose?
- How do you want this brand to be remembered?
- Are you focused on a very specific market or do you want to have a widespread market? Ex: Tools for plumbers vs Tools for tradesmen in general
- What products/services do you offer that no one else is offering? Do you have a specific niche? Do those customers have specific qualities you admire or want to reflect?
- If you created a manifesto, what are 5-10 phrases that you and your employees will have to live by?
- How do you want to help people?
- What does your business look like or feel like in 1, 2, 3, 4, 5 years?
- When people hear your brand name (whatever that currently is or may be), what do you want them to feel?
- Do you plan on putting money back into local communities or charities? Or do you plan on investing in company growth or help your incoming employees with company shares?
- Do you want an inclusive culture or more of a competitive one?
- What are your top 3 qualities you want to promote within your brand when working with your customers? Is it communication or maybe fast turnaround? Is quality more important than quantity? Does customer service top product launches?
- Do you want your brand to convey confidence, consistency, or innovation?
- What are some of the keywords that you want customers to use when describing you to their colleagues and friends?
- What do your customers know they are getting every single time they order or communicate with you?
After your brand essence is discovered:
- How will your website design convey your essence?
- How will your website content convey your essence?
- How will your logo convey your essence?
- How will your brand colors and fonts convey your essence?
- How does your brand name convey your essence?
- Does your brand name provide opportunities for growth? Or do specific words limit opportunities to expand markets? Ex: Words like films, studios, video, & productions can convey the wrong message if a media company does more than just video production. And it limits an ease into growth of other services.
After you’ve done the psychological and emotional legwork of the business upfront, the vision you’ve created will probably lead you to much faster success because you have a core foundation.
Project 2: Decide On Your Brand Name and Purchase The Domain
What you need: Domain Registrar (e.g. GoDaddy.com), Branding Consultant (Maybe)
Deciding on your brand name is a project unto itself and there are many consultants and agencies that can help you pick a brand name. From the perspective of branding yourself online, there are a few items to note in regards to choosing a company name (and website domain) that will work well online.
When choosing your domain name, these are a few items to consider:
- You want a brand name that’s easy for a user to type into Google search and the URL bar in their browser. Avoiding adding numbers or hyphens.
- If you are a local business, you might want to consider using your key service or product along with geographic keywords in your brand name e.g. bradsplumbingchicago.com
- Keep your brand name short and sweet. If the domain for your brand name is already taken, you may consider a new brand name in lieu of adding extra words. For example, let’s say the brand name you’d like is taken – snacks.com. The name of the brand as the root domain will always look better than whatever additional words you may add e.g. thebestsnacks.com, snackscompany.com, snacksonline.com
- For a long time, .com was the way to go. Now, there are many domain name extensions that are industry-specific and that don’t turn off consumers. For a web application, you may consider an .app domain. Nowadays .io domains are popular for tech-related companies. There are many to choose from, however, depending on how strong of a brand image you are looking to portray .com may still be the best way to go.
As far as procuring the domain name, I typically use GoDaddy.com due to their low fees and decent customer support. Also, I do recommend some form of privacy protection for your domain so that people can’t see the personal information associated with your domain name.
Project 3: Create a Logo and Brand Guide
What you need: Graphic Designer, Branding Consultant (Maybe)
Now that you have your brand name and domain, it’s time to create your logo. There are many ways to get a logo created inexpensively via crowdsourcing websites and freelancer marketplaces. Depending on your budget these options may be a good solution for you. However, the best branding and logos come from dedicated designers who create logos and brand guides professionally. I recommend leveraging LinkedIn and doing a search for “logo designer.”
You can also search for branding agencies in your area in Google, or ask for recommendations for good branding agencies or logo designers on LinkedIn. If you’re in Chicago, Rese Designs is a shop that I trust to do great logo design work.
You’ll also want a brand guide created. A brand guide is a document that includes (at a minimum):
- An overview of your brand’s history, vision, personality and key values, brand “voice” and mission statement.
- Logo usage – where and how to use your logo including minimum sizes, spacing and what not to do with it.
- Color palette – showing your primary and secondary color palettes with color breakdowns for print, screen and web.
- Type style – showing the specific font that you use and details of the font family and default fonts for web use.
- Image style/photography – examples of image style and photographs that work well with the brand.
Here are a bunch of inexpensive brand guide templates you can download.
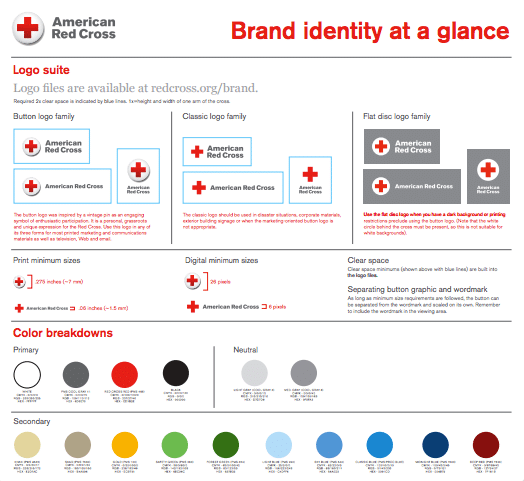
American Red Cross Sample Brand Guide
Project 4: Build Your New Website
What you need: Content Management System/Website Platform (e.g. WordPress, Joomla, Drupal, SquareSpace), Hosting Provider, Web Developer/Designer, Someone to Create Content (Agency/Contractor/Internal Team)
If you’re making a carbon copy of your current website, but just changing the branding:
- Make a carbon copy of your current website on the new domain you purchased.
- Re-brand the new site on the new domain, following the brand guide you created in Project 2 above.
- Once the new site is re-branded, skip to the next project in this guide and create your “301 Redirects Map.”
- Make sure to do a “find and replace” for all mentions of the old brand on the new website. If you’re using WordPress, the Better Search and Replace plugin works very well for this.
If you’re building a brand new website:
Now that you have your brand name, logo, brand guide, and domain name, now it’s time to build your new website. I highly recommend following your brand guide for the color schemes, fonts, and logos for your new website.
As far as which platform to use to build your website, that very much depends on the type of website you’re looking to build. I recommend WordPress, which is what my team uses to build business websites.
We specialize in WordPress because of its intuitive, easy-to-manage back-end, browser-based interface, and extensive customization options. WordPress code is very clean and simple, therefore search engines can easily read and index the site’s content, which helps tremendously for Search Engine Optimization.
That being said, WordPress websites do require ongoing upkeep – plugins must be updated and you’ll need to update your version of WordPress periodically. If you decide to build a WordPress website from a commercially-available theme, you’ll need to update the theme as well.
If you don’t have the time or resources to build and maintain a WordPress website, there are other options like SquareSpace or HubSpot to build your website. But beware, these are “closed source” platforms, meaning that you will not have 100% control over the source code of your website and are restricted to the features and functions offered by the platform. You might want a new feature but it’s not available from the platform and then you’re stuck.
There are pros and cons to every website platform. Some questions to ask yourself while selecting the optimal platform are:
- Do I have the budget to hire a professional or agency to build my website and maintain it?
- How important is having an “open source” platform versus a “closed source” platform?
- What functions will the website need to have?
- What functions will my team need in the back-end of the site. What will we be doing most often when updating the website?
Note that you will also need to procure hosting (essentially the online real estate that your website will live on). There are many companies that provide hosting. I typically use Media Temple. Wherever you purchased your domain name e.g. godaddy.com will likely have a hosting solution as well. Regardless of the hosting provider, if you are new to hosting and server administration, I recommend calling or live-chatting with a few hosting providers and outlining what you want your site to do and have them recommend a hosting package to you based on your requirements.
Once you’ve selected the platform that you want to build your new website on, set the platform up on your new domain. This process varies depending on your chosen platform, a quick Google search of “platform name set up on new domain” will help you to find step-by-step instructions. Make sure that as you’re building the new website, your old website is still up-and-running for the time being. You’ll also want to password-protect the new site as you’re building it out, so that there isn’t any confusion for search engines or users.
The next project will outline what to do once your new website is complete.
Project 5: Create a 301 Redirect Map
What you need: Excel, ScreamingFrog
Note: This project assumes that you already have a website and that you’re now moving to a new domain.
A 301 redirect is a permanent redirect from one URL to another. 301 redirects send site visitors and search engines to a different URL than the one they originally typed into their browser or selected from a search engine results page. It’s extremely important to set up 301 redirects from your old website domain to your new one e.g. oldsite.com to newsite.com to ensure that your visitors get to the right website and that you transfer the SEO value of the old website to the new website.
You’ll need to map out your old URLs to the new domain once your new website has been published. The easiest way to do this is by creating a spreadsheet with two columns. One for the “old domain” and one for the “new domain.”
If you don’t have a current list of all the URLs on your website, Screaming Frog is an excellent tool that will scan your current website and provide a list of all URLs. You can then export this list and turn it into your 301 Redirect Map.
Keep in mind that if you have a brand new website, certain pages may not exist on the new site or it may makes sense to send old pages to applicable new parts of the website. If the URL address is even changed by one character you’ll need to implement a redirect map.
Example: If the “About Us” page on the old site is oldsite.com/about and on the new site it’s newsite.com/about-the-team, you’ll need to implement a 301 Redirect from oldsite.com/about to newsite.com/about-the-team.
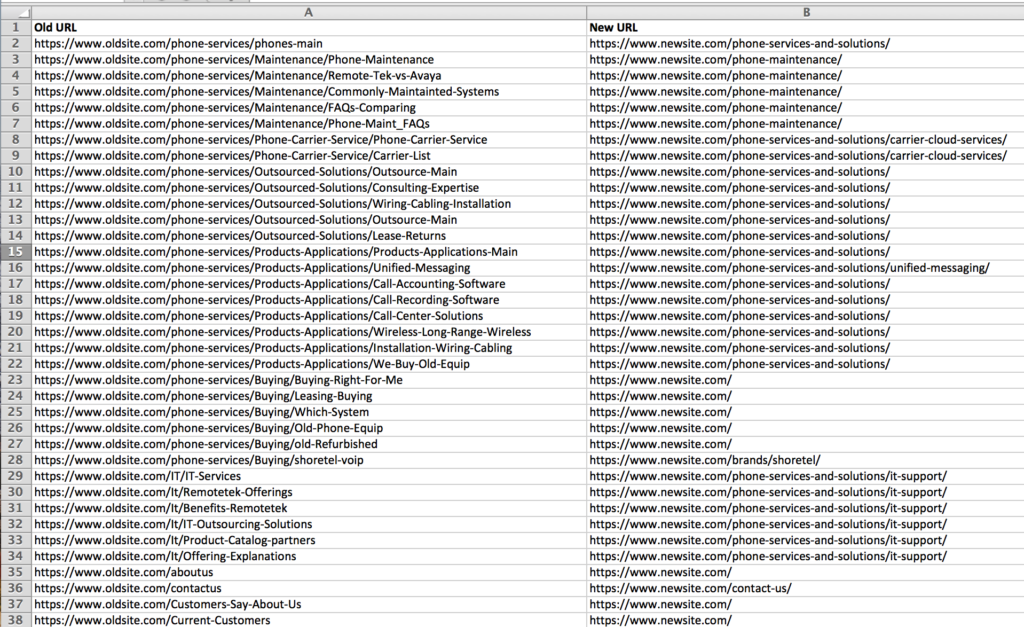
Sample 301 Redirect Map
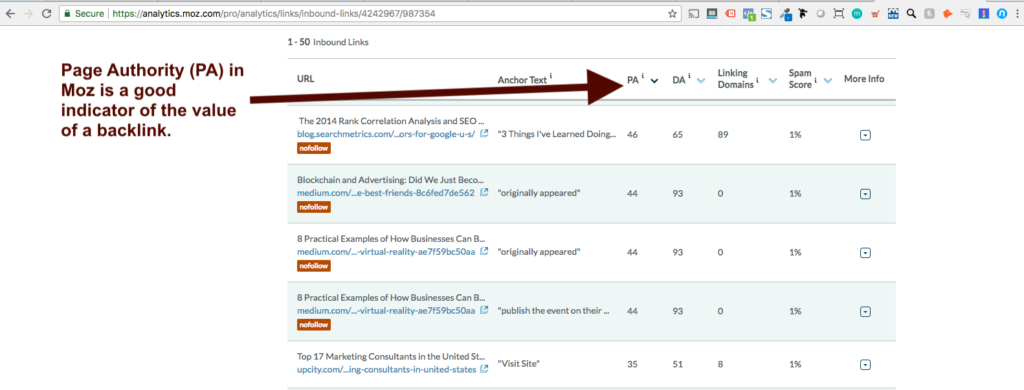
Project 6: Do an Inbound Link Query
What you need: Moz, SEO Consultant (Maybe)
One of the most important SEO ranking factors are the inbound links to your website from other websites, sometimes called “backlinks.”
Before flipping the switch to make your new domain live, you need to take stock of the links to your current website domain.
Keep in mind that, according to Google, a 301 redirect does transfer 100% of the Google PageRank in the old URL – in important ranking signal for SEO – to the new URL. That being said, once the new website is live, you’ll need to take stock of your inbound links and whether or not they are redirecting to your new website.
Take stock of your high-value inbound links, which I typically gauge by looking at the top referrers of inbound traffic/conversion in Google Analytics as well as the highest “Page Authority” pages in Moz.
Now, depending on how different your products/services/messaging is in the new brand versus your old one, it may make sense to reach out to people who are providing your high-value links to your old site and request that they update their websites to include your new domain.
For example, on a website from one of your high value linkers, the website content may say something like:
“Company performs business-to-business accounting services at oldsite.com.”
However, if your new brand is business-to-consumer accounting services, you may want to have the website update the sentence so that it’s relevant to your new brand and so you don’t confuse prospective customers who discover your new brand your site via that link.
This can be a tricky project since some webmasters will ignore your request completely and some may even just take your link off their site in lieu of them having to do the work of updating their website. It’s your call on whether or not to reach out to them; if you have good relationships with your high-value linkers this is an easier proposition than if you don’t.
Project 7: Make Backups of the Old Site
What you need: Access to your hosting environment or a backup plugin like UpDraft Plus for WordPress
Make a full backup of your current website and all databases. You may need your developer’s help for this project. I recommend making a few copies of the website and storing one on your local computer or external hard drive and another on a cloud-based storage system e.g. Google Drive or Dropbox. The last thing you want to have happen is to need a piece of your old website, need to refer back to it, or to have to restore something from it and not have access to it.
If you’re using WordPress for your websites, I highly recommend a backup plugin called UpDraft Plus, which will automatically create backups of your full website for you periodically and allows to you to easily restore your website from a backup.
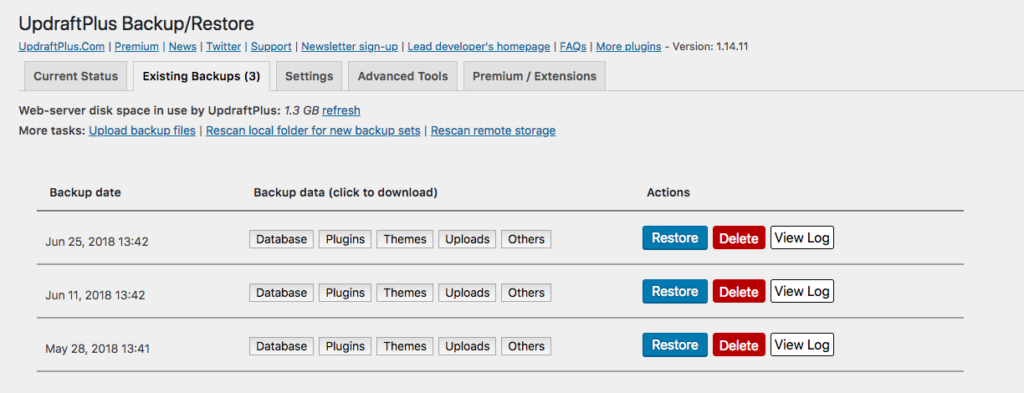
UpDraft Plus WordPress Plugin Running on a WordPress Website
Project 8: New Website Go-Live / 301 Redirect Execution
What you need: Server-Side Access, the 301 Redirect Map you created in Project 4 above
Note: If you have not submitted the old site to Google Search Console, do that before go-live and 301 redirect (see Project 8 below).
Both websites (both the old site on the old domain and the new site on the new domain) should be live prior to implementing the redirects. You can take the old website down/archive it after the redirects have been completed.
There are a few ways to execute 301 redirects. There’s a great plugin for WordPress called Simple 301 Redirects that allows you to upload the entire 301 Redirect Map you created in Project #4 above and redirect at the push of a button.
There are other tools out there for this, depending on what platform your website is built on. A quick Google search of “301 redirects tool for platform” might help you find the tool you need. If not, you will have to have your developer or hosting administrator follow your 301 Redirect Map and execute the redirects on your server.
Now that you have your old website backed up and your new website ready to launch on your new domain, it’s time to go-live with your new website. Remove your password protection from the new website so that it is live on the new domain. You may feel the urge to pop a bottle of champaign at this step, but hold off until you finish the rest of the projects below.
Project 9: Google Search Console Updates (do this for Bing Webmaster Tool as well here).
What you need: Google Search Console
Google Search Console (previously Google Webmaster Tools) is a no-charge web service by Google for webmasters. It allows webmasters to check indexing status and optimize visibility of their websites.
First, make sure that your current website (the old brand/domain) has been added as a property to Google Search Console.
Once your new website is live, there are a few projects you’ll need to execute in Google Search Console. Note that there is a new version of Google Search Console currently being rolled out by Google, however, some of the functions below are only available in the “old” version of GSC.
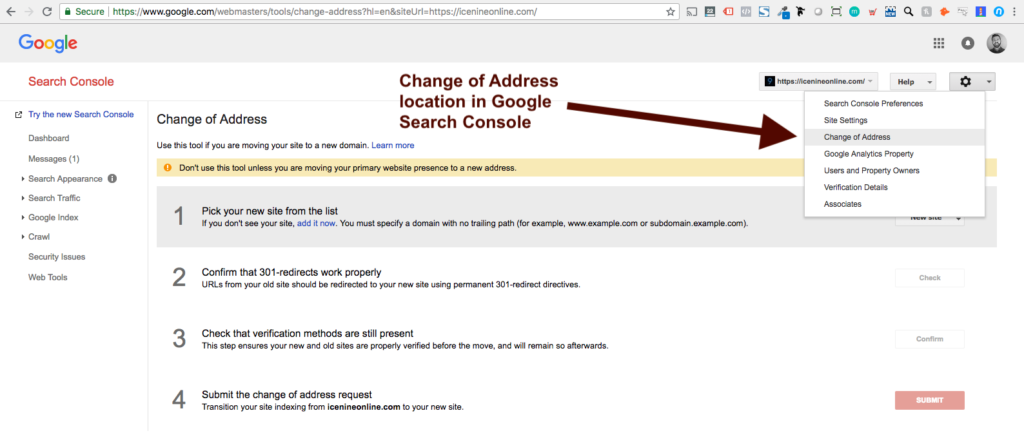
- Submit the new website to Google Search Console by going to https://www.google.com/webmasters/tools/dashboard > Add Property Now
- Submit a “Change of Address” by going to: https://www.google.com/webmasters/tools/dashboard > Gear Icon in Top Right Corner (on Desktop) > Change of Address > Follow the Steps
- Submit a new XML Sitemap for the new website in the new website’s Google Search Console by going to https://www.google.com/webmasters/tools/dashboard > Sitemaps > Add/Test Sitemap
- Once the above steps have been completed, check your index status here: https://www.google.com/webmasters/tools/index-status
- Once the above steps have been completed, do a “fetch as Google” to ensure that your website’s pages are showing up properly in Google here: https://www.google.com/webmasters/tools/googlebot-fetch
- Make sure the new site’s robot.txt file has been implemented properly here: https://www.google.com/webmasters/tools/robots-testing-tool
Project 10 (Post 301-Redirects): Re-Brand Notification
What you need: PopupBuilder plugin (WordPress), a Web Developer
You now have a new brand name and due to the 301 redirects you’ve implemented, people who have the old brand’s website saved in their bookmarks, an email, etc. will see the new website when they click the old link. This is what you want to happen, however, this can be confusing to people that don’t know that you rebranded. They will be caught off guard when they are expecting to visit a website for the old brand, but instead go to the new one.
Therefore, it’s a good idea to have some sort of notification about the re-brand on your new website.
There’s a good WordPress plugin for this called PopupBuilder that will allow you to create a pop-up that will notify people that you’ve rebranded. This plugin is nice because it allows you to set it so that users only receive the pop-up once. On future visits to the website, they won’t continue seeing it. It also allows people to quickly click out of the pop-up (instead of some tiny link text) so it’s not too annoying to the user.
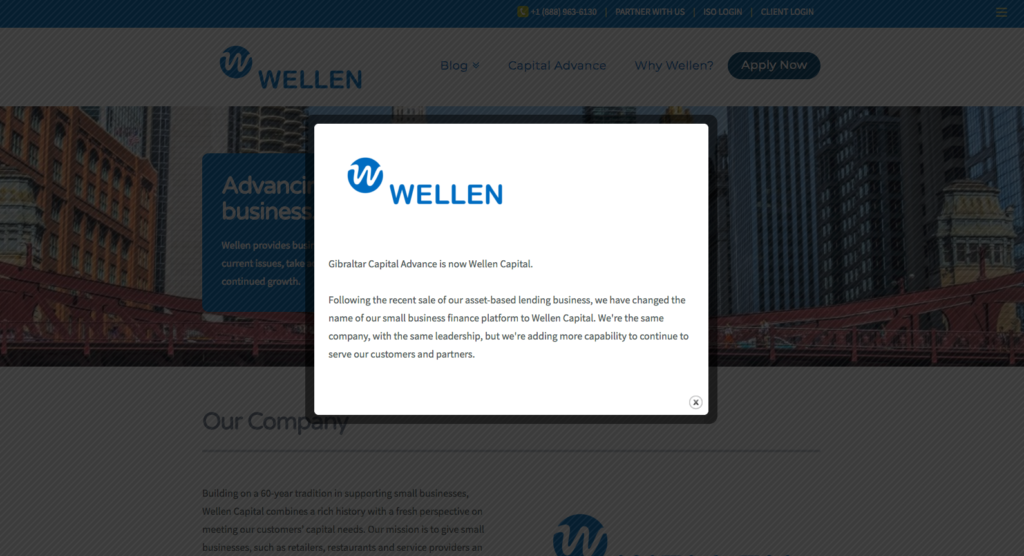
Sample Re-Brand Pop Up Message
Project 11 (Post 301-Redirects): Directory Updates
What you need: credentials (usernames and passwords) to all of your directories
Chances are you have information about your business on various directories e.g. Yelp, Yellowpages.com, Manta, etc. Make sure that the information on these directories has been updated. How do you find these directories and mentions of your company? Remember that Inbound Link Query in Project 5 above? It’s about to come in handy right now.
Note: it’s a really good idea to keep a master list of all the directories that your company is listed on (along with login credentials). Now is a really good time to inventory your directories and create this list if you haven’t already.
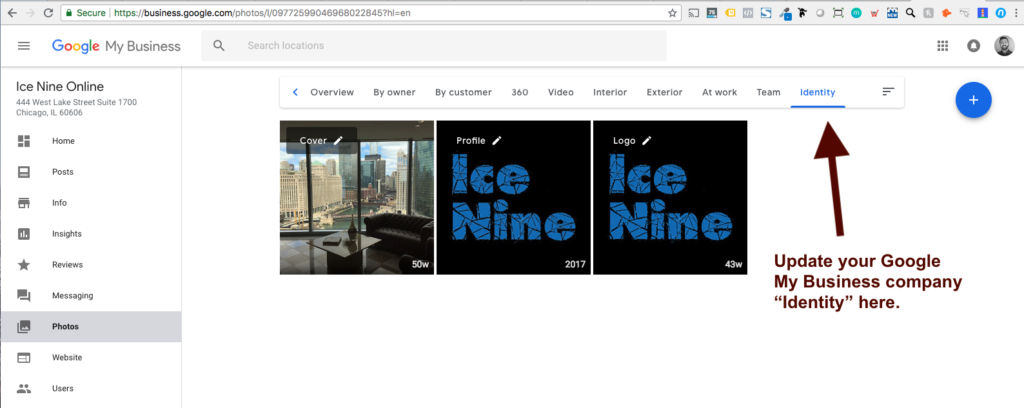
Make sure to update your company’s info on Google My Business. You certainly don’t want people searching for your brand name to see your old name and logo in Google. Make sure to update the “identity” section in Google My Business. The “identity” section is where Google pulls your logo into Google’s Search Engine Results Page. I’ve found that if you update this section and Google doesn’t reflect the change within 48 hours, you can request that they change your logo by going to your Google My Business page in Google, clicking on the photo of your old logo, and then clicking the “Report a problem” flag in the top right-hand corner (on desktop) and then submitting a message under “Other” with something like this as the text request:
“We have rebranded and are no longer called XXXXXXX. Please remove this logo so that our customers are seeing the appropriate new company logo.”
When I did this for one of my clients, Google removed the old logo within 24 hours.
Project 12 (Post-Rebrand): Google Analytics Update
What you need: Google Analytics
Now that you have a new domain, you’ll need to update your Google Analytics account.
- First, you’ll need to make the decision to keep your existing Google Analytics account or create a brand new one for the new brand. Unless there’s a specific reason you need a new Google Analytics account, I recommend keeping your existing Google Analytics account. That way you’ll have access to the historical data in the account for your old brand in addition to any customizations you’ve made in the account.
- Make sure that your Google Analytics tracking code is on the new website.
- Update the names and labels for the Account, Property and View to reflect the new brand name or domain.
- Update any filters you’ve created with the new domain (where applicable).
- Update the default URL in the account to the new domain in Admin > Property Settings.
- Link your Google AdWords and Google Search Console accounts, and social tracking.
- Check your Content Grouping configuration to ensure the change of URLs will not adversely affect this.
- Update your Goal Tracking – e.g. if you’re set to have a “thank you” page visit count as a conversion, you’ll need to update that goal with the new URL.
- Make a “note” in Google Analytics on the day that you rebranded so you can compare data on your old domain to the new domain.
Project 13 (Post-Rebrand): Add the Facebook Pixel to Your Website
What you need: Facebook Business Manager account access, access to the back-end of your website, the “Insert Headers and Footers” plugin (if your website is built on WordPress)
Contributed by Tucker Ferwerda, www.prelaunchprofit.com
Note: these directions are for “Desktop” users.
- First, log into your Facebook account and click the drop down arrow in the upper right hand side of the menu. Click “Manage Ads.”
- Next, Choose your ad account. What you see might be different depending on what stage you are at in the ad account setup.
- Next, click the “Ads Manager” button at the top left of the screen and click “Pixels. Note: This could also look different depending on what stage you are at in the ad account set up. Follow the set up steps to set up a new pixel or click details.
- Next, click “Set up” in the top right corner.
- Choose “Manually Install the Code Yourself.” Copy the pixel code.
- Paste the code into your website header (and make sure to save). The code is now installed!
For WordPress Installation:
- Next, click and copy the code. Now log into your WordPress back-end and go to Plugins. Click “Add New.”
- Search for and install the “Insert Headers and Footers” plugin. You’ll find the “Insert Headers and Footers” button in the “Settings” section.
- Paste in your code into the “Scripts in Header” section, click save, and your pixel is now installed!
Project 14 (Post-Rebrand): Update Social Media and Other Online Accounts
What you need: Credentials for your social media accounts
I recommend starting this project by prioritizing your most important social media accounts and then tackling them one at a time. You’ll need to update your logo and banner in each social media profile individually.
On Facebook, you should peruse your profile with a fine-tooth-comb, looking for any mentions of the previous brand and replacing it with the new brand. Make sure the check all of the “about” and “services” sections of your profile.
For twitter, it’s probably a good idea to tweet out the press release or blog post announcing the rebrand and setting that tweet as your “Pinned Tweet.” It also isn’t a bad idea to announce the rebrand in your twitter profile section.
If you don’t have a graphic designer, Canva.com is a great resource for templates for social media banners.
Once all the public-facing social media profiles have been updated, next is the (painstaking) process of going through all of your internal tools and rebranding them. Your CRM, project management tools, staffing portals, etc. all should be rebranded.
Project 15 (Post-Rebrand): Market Your New Brand
If you haven’t released a press release announcing the new brand, it’s a really good idea. The press release will allow you to:
- Notify a bunch of people about the rebrand.
- Give you a 3rd party in link in Google announcing the new brand, which will serve as a notification to people searching for your company in Google (usually Press Releases rank highly in Google and other search engines).
- Allow you to have a quality article about the rebrand that you can share on social media
- Give credibility to the new brand…like you’re rebranding “the right way.”
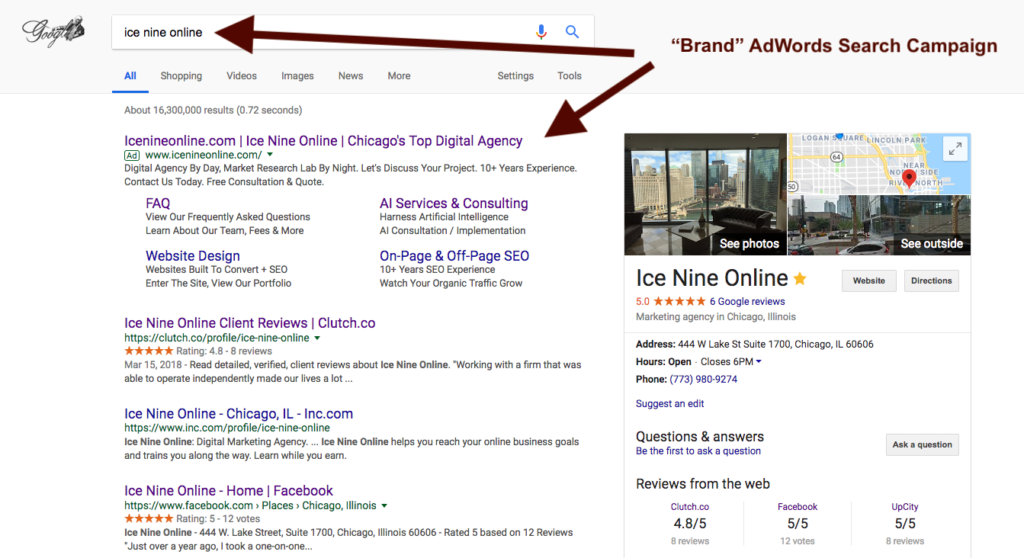
It’s also not a bad idea to create a “branded” Google Ads Search campaign, bidding on the new brand name. This will allow you to control what people see at the top of Google when they search for the new brand. You could also create Remarketing campaigns in both Google Ads and Facebook Ads to notify your prior website and Facebook visitors of the name change.
Also, it’s a good idea to create a blog post or page on your new website that explains the new brand. This will be a handy URL (especially if you don’t release a press release) to send to people about the rebrand and will likely get good rankings in Google for the new brand name. Don’t forget to use the name of the new brand in the Title Tag and Meta Description for this page or post!
About the Author
Share this Post
Comments
Nice Post
logo of the company always present you the best and most important part of the branding your business
Great post, thanks for sharing this great guide about rebranding. rebranding is a great idea for any business, and I also planning for rebranding. That was a great read and useful too. Keep sharing more.
Nice in-depth guide almost like a brand’s whole lifecycle step by step template to follow.
Very Informative and well Explained.